Saturday 30 January 2016
Tuesday 29 December 2015
Healthy Blueberry and Banana muffins
I absolutely love muffins but most of them contain a lot of sugar and butter so I decided to make a healthier version of blueberry and banana muffins which are not only sugar free but butter free too.
These muffins are delicious ( you wouldn't believe they are healthy ;) )
Ingredients :
1 cup of blueberries ( I used frozen)
1 large ripe banana
1 medium egg
1 and 1/2 cups of self raising flour
1/2 teaspoon of baking powder
pinch of Himalayan salt
4 tablespoons of milk ( add more if needed)
1/4 cup of real 100% maple syrup
1 tea spoon of pure vanilla extract
1/4 cup oil ( I used rapeseed) Method and preparation:
(sorry I didn't take photos of the process)
pre heat your oven to 180/350f
1. mash the banana with a fork in a mixing bowl.
2. sieve the flour, salt and baking powder into the bowl.
3.In another bowl , add in the egg, milk, vanilla, oil and milk and whisk well.
4. Now in a separate bowl add the blueberries and a little flour to them .This will help the blueberries from sinking.
5. add the wet ingredients into the dry ingredients and gently mix until you don't see and dry flour. Do not over mix, lumpy is good.
6. add the blueberries and gently fold into the batter.
7 . grease your muffin pan and add an equal amount of batter . I used an ice cream scoop.
Bake on the middle shelf of the oven for 25 minutes.
keep an eye on the muffins as oven temps vary.
This recipe makes 6 muffins.
I hope you try out this recipe.
Enjoy :)


Lovely with a glass of your favourite milk or a cup of tea :)
Sunday 29 November 2015
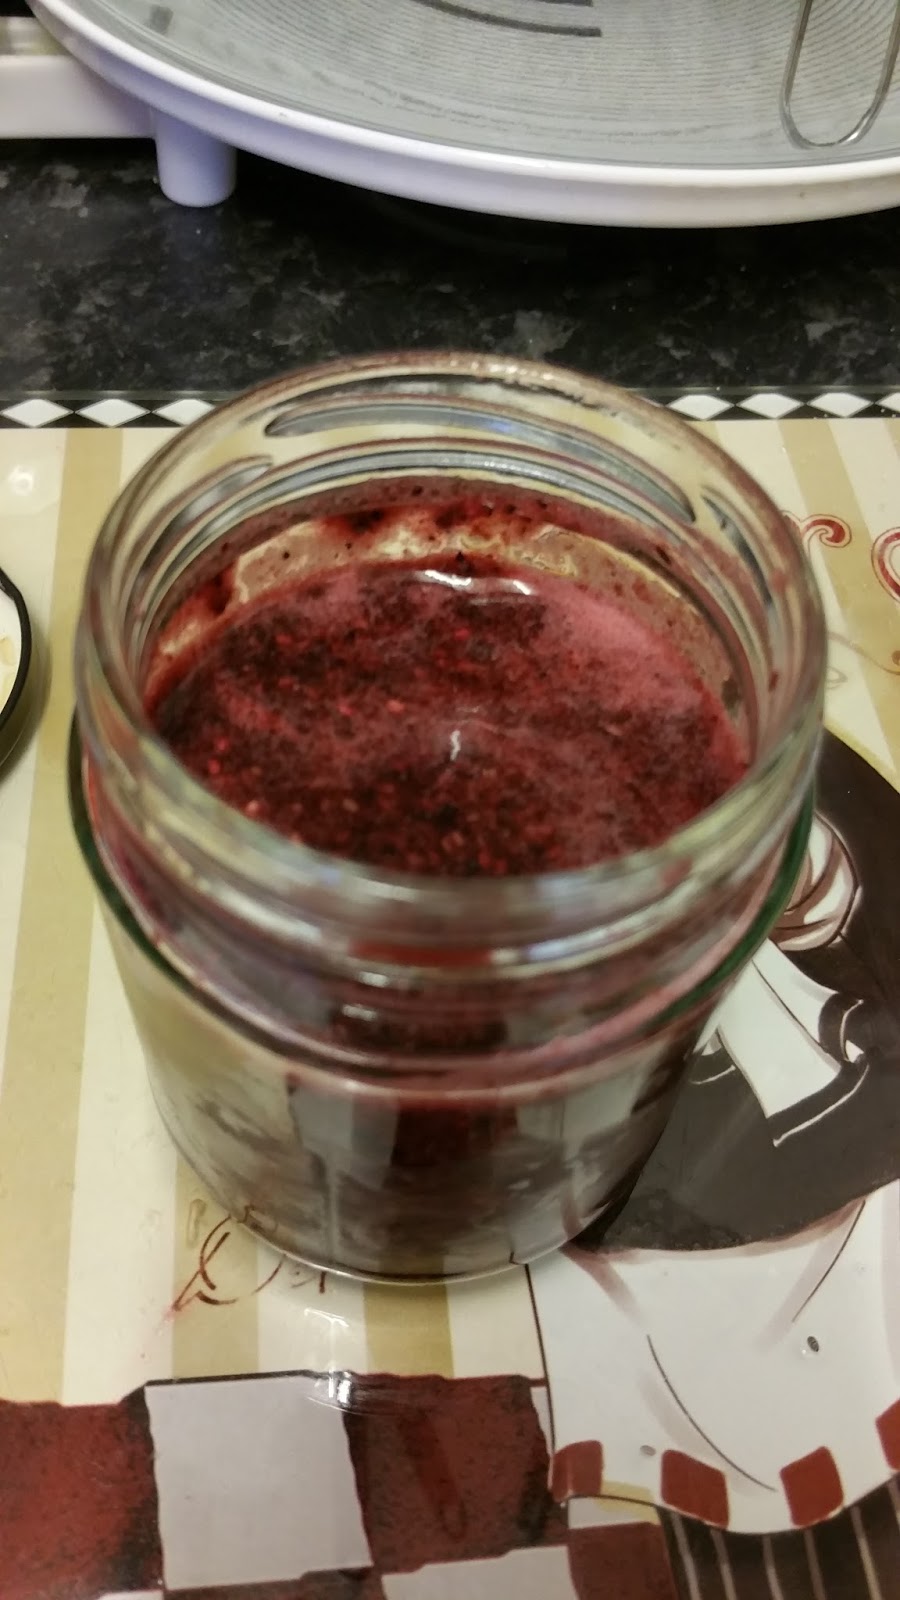
Blueberry chia jam
If you love jam but don't want the extra added sugars and additives that the shop bought jams have then this jam is just for you. It literally takes five minutes to prepare and tastes amazing. Better still ..there's no need to cook it so you can enjoy it in no time and it's sugar free and guilt free.
Ingredients :
1 cup of fresh or frozen blueberries
1 tablespoon of 100% pure maple syrup
Juice of half a lemon
2 Tablespoons of chia seeds
Method and preparation:
Have the ingredients ready and thaw out the blueberries if you are using frozen ones.

Add the blueberries to a blender.

Add juice of half a lemon.

Add a tablespoon of 100% pure maple syrup

Now blend to the thickness you like .

Once blended for a few seconds pour the mixture into a clean bowl.

Now add 2 tablespoons of chia seeds.


Mix well until all the chia seeds are covered in the mixture.
it will look like this.
See how it is beginning to thicken already!

Now pour the jam into a clean glass jar and let it sit in the fridge to thicken up for about 45 minutes .


Once it has thickened it ready to enjoy straight from the jar or spread on toast, oatmeal, yogurt or anything you desire.
It's healthy jam so feel free to enjoy it without guilt.
This jam will last in the fridge for two weeks :)
serving suggestions:


I hope you try out this recipe and enjoy it :)
Thanks for stopping by.
Ingredients :
1 cup of fresh or frozen blueberries
1 tablespoon of 100% pure maple syrup
Juice of half a lemon
2 Tablespoons of chia seeds
Method and preparation:
Have the ingredients ready and thaw out the blueberries if you are using frozen ones.

Add the blueberries to a blender.

Add juice of half a lemon.

Add a tablespoon of 100% pure maple syrup

Now blend to the thickness you like .

Once blended for a few seconds pour the mixture into a clean bowl.

Now add 2 tablespoons of chia seeds.


Mix well until all the chia seeds are covered in the mixture.
it will look like this.
See how it is beginning to thicken already!

Now pour the jam into a clean glass jar and let it sit in the fridge to thicken up for about 45 minutes .

Once it has thickened it ready to enjoy straight from the jar or spread on toast, oatmeal, yogurt or anything you desire.
It's healthy jam so feel free to enjoy it without guilt.
This jam will last in the fridge for two weeks :)
serving suggestions:


I hope you try out this recipe and enjoy it :)
Thanks for stopping by.
Sunday 8 March 2015
Homemade Sriracha Vegan (Vietnamese Chilli Sauce)
I'm a huge fan of hot sauce and use it on practically everything I eat which is savoury.
To run out of Tabasco sauce would be a tragedy for me lol.
I've seen lots of pics and reviews about Sriracha sauce but for a few reasons I was put off getting it online as it has so many preservatives in it and also fish sauce not making it vegetarian or vegan. I want a sauce that can be enjoyed by everyone so I decided to make my own with all good healthy ingredients and no dodgy unpronounceable additives.
This sauce is absolutely delicious. If you want some extra spice in your life then carry on reading and enjoy the recipe :)
Ingredients:
12 Red chilies ( I used medium heat)
1 red bell pepper
6 Garlic cloves
6 chunks of fresh pineapple plus tbs of juice
2 tbs coconut palm sugar
3 twists of Himalayan salt
1/2 cup of white distilled vinegar
1/2 cup of water.
Method and preparation :
Firstly have all of your ingredients ready at hand.

Wash the Chilies and Bell pepper and remove the skin of the garlic cloves.

Make sure to wear gloves whilst slicing the chilies as they are very hot and WILL burn.
Have a glass mixing bowl at hand to add the chopped chilies and pepper.
The seeds and membrane of the chili has the most heat so feel free to remove them if you want a less spicy sauce. I added them in my sauce.
Add the chilies , pepper, garlic cloves and pineapple chunks to the bowl

Now add the coconut palm sugar , Himalayan salt, vinegar and water and give the mixture a gentle stir.

Cover the bowl with cling film and leave it in the fridge to brine over night. Mine went in the fridge at 9 pm and I removed it at around pm the next day.

It should look like this when you remove it from the fridge.

Carefully pout this into a blender ( watch out for splashes in your face.

Blend until smooth about five minutes, stopping occasionally.

It looks like this after 5 minutes.
Now get a large pan and carefully transfer the liquid from the blender into it.

Bring the liquid to a boil and then turn the heat down and let it simmer for 7-10 minutes.

Once the ten minutes is up , remove the pan of the heat and lightly skim the foam off the top.

Now carefully add the sauce back into the blender and whiz it up for about 10 seconds .


Now get a sieve and put it over the glass bowl.

Carefully pour the sauce into the sieve.

Gently stir the sauce with a wooden spoon to give it a helping hand to push through the sieve.

Make sure you get every last drop ;) and then either discard the pulp or wrap it in some cheese clock and use it for stock in another recipe :)
Skim the foam from the top if you wish.

Now find a pretty jar or bottle like this ..

Make sure it's clean..
put a funnel on the opening.

Now carefully pour the sauce into the bottle , put on the lid and refrigerate until ready to use.


The sauce will last about a month in your fridge. And tastes even better the day after it is made although it is ready to eat straight away :)
I hope you enjoy this recipe.
Thanks for looking :)
To run out of Tabasco sauce would be a tragedy for me lol.
I've seen lots of pics and reviews about Sriracha sauce but for a few reasons I was put off getting it online as it has so many preservatives in it and also fish sauce not making it vegetarian or vegan. I want a sauce that can be enjoyed by everyone so I decided to make my own with all good healthy ingredients and no dodgy unpronounceable additives.
This sauce is absolutely delicious. If you want some extra spice in your life then carry on reading and enjoy the recipe :)
Ingredients:
12 Red chilies ( I used medium heat)
1 red bell pepper
6 Garlic cloves
6 chunks of fresh pineapple plus tbs of juice
2 tbs coconut palm sugar
3 twists of Himalayan salt
1/2 cup of white distilled vinegar
1/2 cup of water.
Method and preparation :
Firstly have all of your ingredients ready at hand.
Wash the Chilies and Bell pepper and remove the skin of the garlic cloves.
Make sure to wear gloves whilst slicing the chilies as they are very hot and WILL burn.
Have a glass mixing bowl at hand to add the chopped chilies and pepper.
The seeds and membrane of the chili has the most heat so feel free to remove them if you want a less spicy sauce. I added them in my sauce.
Add the chilies , pepper, garlic cloves and pineapple chunks to the bowl
Now add the coconut palm sugar , Himalayan salt, vinegar and water and give the mixture a gentle stir.
Cover the bowl with cling film and leave it in the fridge to brine over night. Mine went in the fridge at 9 pm and I removed it at around pm the next day.
It should look like this when you remove it from the fridge.
Carefully pout this into a blender ( watch out for splashes in your face.
Blend until smooth about five minutes, stopping occasionally.
It looks like this after 5 minutes.
Now get a large pan and carefully transfer the liquid from the blender into it.
Bring the liquid to a boil and then turn the heat down and let it simmer for 7-10 minutes.
Once the ten minutes is up , remove the pan of the heat and lightly skim the foam off the top.
Now carefully add the sauce back into the blender and whiz it up for about 10 seconds .
Now get a sieve and put it over the glass bowl.
Carefully pour the sauce into the sieve.
Gently stir the sauce with a wooden spoon to give it a helping hand to push through the sieve.
Make sure you get every last drop ;) and then either discard the pulp or wrap it in some cheese clock and use it for stock in another recipe :)
Skim the foam from the top if you wish.
Now find a pretty jar or bottle like this ..
Make sure it's clean..
put a funnel on the opening.
Now carefully pour the sauce into the bottle , put on the lid and refrigerate until ready to use.
The sauce will last about a month in your fridge. And tastes even better the day after it is made although it is ready to eat straight away :)
I hope you enjoy this recipe.
Thanks for looking :)
Wednesday 11 February 2015
Curried Pumpkin soup
This soup is a real hearty winter warmer like getting a warm cuddle in your belly (it really is) There's nothing better than a nice warm bowl of soup when you're feeling a bit under the weather and need a pick me up.
I had a Butternut squash that needed using up so I thought I'd cheer myself up with this yummy bowl of goodness :) It's so easy and tasty and most of all it's healthy :) Give it a try.
Ingredients:
2 cups of pumpkin puree (butternut squash)
1 stick of celery diced
Half a yellow onion diced
1 clove of garlic minced
1 medium sized carrot sliced
Ground black pepper as needed
Himalayan salt as needed
1/2 tsp of Curry powder
sprig of thyme
2 and 1/2 cups of water
Olive Oil (drizzle)
Dollop of fat free yogurt
Method and preparation:
Add a drizzle of olive oil to a large pan and heat gently.
Add the onion and garlic and saute for a few minutes until the onion is soft.
Now add the celery and carrots and give it a stir.
Add in the pumpkin puree and add all the seasonings along with the water.
Bring the soup to a boil and turn the heat down and let it simmer for 20 minutes with the lid on but leaving a slight gap.
Stir occasionally so that it doesn't stick or burn.
After the 20 minutes is up taste for seasoning and adjust to your liking.
Now either use a jug blender or stick blender to puree the soup to the consistency of your liking or serve it as it is (chunky) I pureed mine with a stick blender.
Put it back on the heat to warm it up for a minute or two and serve in a bowl with a dollop of fat free Greek yogurt .
Servings : 2
Notes:
I wanted this to be a healthy recipe , that's why I haven't used a stock in my soup as it contains too much sodium and adds to the calories. Water did the job perfectly as the seasoning gave it enough flavour.
I also used Himalayan salt as it is extremely healthy for you, tastes better and has no calories :)
I also used fat free yogurt in place of cream/creme fraiche.
try it out and let me know what you think :)
Enjoy and happy cooking.
Sunday 1 February 2015
Baked Cinnamon and Maple Pears
If you have any pears in your fruit bowl that are slightly ripe , why not try making this warm and delicious dessert perfect for the winter :)
It's super easy and you'll be really impressed.
Go on... give it a try.
Ingredients:
pears peeled cut in half and cored. (as needed)
Brown sugar to sprinkle on top.
Maple syrup to drizzle over pears
Cinnamon to sprinkle over pears.
Method and preparation:
preheat the oven to 180/350
Carefully peel the pears and cut them in half and core them. I left the stalks on for decoration but you can remove them.
Place the pear halves in an oven proof dish and sprinkle the sugar and cinnamon all over them and finally drizzle the maple syrup over them and bake for 10 minutes.
Plate them up and enjoy with a scoop of ice cream or whipped cream :)


Happy eating :)
It's super easy and you'll be really impressed.
Go on... give it a try.
Ingredients:
pears peeled cut in half and cored. (as needed)
Brown sugar to sprinkle on top.
Maple syrup to drizzle over pears
Cinnamon to sprinkle over pears.
Method and preparation:
preheat the oven to 180/350
Carefully peel the pears and cut them in half and core them. I left the stalks on for decoration but you can remove them.
Place the pear halves in an oven proof dish and sprinkle the sugar and cinnamon all over them and finally drizzle the maple syrup over them and bake for 10 minutes.
Plate them up and enjoy with a scoop of ice cream or whipped cream :)
Happy eating :)
Monday 26 January 2015
Spicy Kale chips
If you're looking for a tasty healthy and guilt free alternative to crisps(potato chips) then this is the recipe for you :)
This recipe is so tasty and you can go wild with adding any flavouring that you love and best of all you can eat lots of it without feeling guilty. I love crisps and really needed this alternative for a bit of a crisp free detox so I decided to try Kale and wow it tastes amazing, I strongly urge you to give it a try.
Ingredients:
Kale on a stalk or in a bag , it doesn't matter ( I used already cut kale in a bag)
salt as needed
pepper as needed
olive oil to drizzle or flavoured oil (I used chili rapeseed oil)
Method and preparation:
pre heat your oven to 180/350
Wash the kale thoroughly and make sure it's completely dry by using a salad spinner or paper towels.
Spread the kale on a lined baking tray making sure not to overlap any kale as it won't cook evenly.

Now add the salt and pepper from a height to ensure even seasoning. And drizzle about a table spoon of olive oil over the kale.

Use your fingers to massage the seasoned oil into each of the leaves.

Spread the leaves in a single layer .
Now place the trays in the oven and bake for 5 minutes, after the 5 minutes are up swap the trays for even cooking and cook for a further 5 minutes until nice and crispy.
Serve the crispy kale chips in a bowl and enjoy :)

Notes:
If you are using kale from a stalk , make sure to remove the rib which is the thick part, you don't cook this.
Make sure the kale is completely dry after washing or else you'll end up with steamed rather than crispy kale.
Oven temps vary so please keep and eye on the kale as it's baking as you don't want it to burn.
Have fun experimenting with flavours :) and enjoy.
This recipe is so tasty and you can go wild with adding any flavouring that you love and best of all you can eat lots of it without feeling guilty. I love crisps and really needed this alternative for a bit of a crisp free detox so I decided to try Kale and wow it tastes amazing, I strongly urge you to give it a try.
Ingredients:
Kale on a stalk or in a bag , it doesn't matter ( I used already cut kale in a bag)
salt as needed
pepper as needed
olive oil to drizzle or flavoured oil (I used chili rapeseed oil)
Method and preparation:
pre heat your oven to 180/350
Wash the kale thoroughly and make sure it's completely dry by using a salad spinner or paper towels.
Spread the kale on a lined baking tray making sure not to overlap any kale as it won't cook evenly.
Now add the salt and pepper from a height to ensure even seasoning. And drizzle about a table spoon of olive oil over the kale.
Use your fingers to massage the seasoned oil into each of the leaves.
Spread the leaves in a single layer .
Now place the trays in the oven and bake for 5 minutes, after the 5 minutes are up swap the trays for even cooking and cook for a further 5 minutes until nice and crispy.
Serve the crispy kale chips in a bowl and enjoy :)
Notes:
If you are using kale from a stalk , make sure to remove the rib which is the thick part, you don't cook this.
Make sure the kale is completely dry after washing or else you'll end up with steamed rather than crispy kale.
Oven temps vary so please keep and eye on the kale as it's baking as you don't want it to burn.
Have fun experimenting with flavours :) and enjoy.
Subscribe to:
Posts (Atom)